GoogleWorkspace内にGoogleフォームを設置し、ファイルのアップロードをさせたかったのですが、共有フォルダに格納した時点で画像のアップロード機能が使用できなくなりました。
それならばGASでフォームを自作しようと思ったのですが、アクセスユーザの取得にはアクセスユーザでWebサイトを動かす必要があるものの、非公開フォルダ・ファイルにアクセスできない問題が発生しました。
アクセスユーザで動かしたGASからスクリプト作成者で動かすGASへデータをPOSTすることで、アクセスユーザの取得と非公開フォルダ・ファイルへのアクセスを両立させることにしました。
実装時に画像の処理が一番つまづいたので併せてまとめておきます。
この記事では以下のステップでコードを解説しています。
1. 仕組みとメリット・デメリット
アクセスユーザで動作させたWebサイトでフォームを入力・送信し、入力した値をGAS側に渡します。
アクセスユーザで動作させたGASでアクセスユーザの情報を取得し、画像ファイルをエンコードします。
ユーザ情報とエンコード後の画像データを添えて同一のGASファイルから生成したURLへPOSTします。
スクリプト作成者で実行したGASで渡された画像データをデコードします。
非公開フォルダに画像を保存し、非公開スプレッドシートへ渡されたユーザ情報と併せてリスト化します。
- POSTを同一のGASファイルから行うことで、CORSエラーが発生しない
- 1クリック内でアクセスユーザ・スクリプト作成者のどちらでもGASを動作させられる
- Googleフォームを利用できる場合、Googleフォームを利用するよりも開発工数が増える
2. コード一覧
「ファイルを追加」から以下のファイルを作成し、各々コードを書き換えてください。
※ { } 部分をコードに直接記述すると、ライブラリとして公開されるURLを利用した際に外部のユーザが取得できてしまうため、{ デフォルト設定値 }から変更しないでください
- gas.gs
- index.html
gas.gs
サーバー側の処理部分になります
function setup() {
  PropertiesService.getScriptProperties().setProperty('POST_URL',"{POST先のURL}");
  PropertiesService.getScriptProperties().setProperty('FOLDER_ID', "{画像を保存するフォルダのID}");
  PropertiesService.getScriptProperties().setProperty('SS_ID_OUTPUT', "{ログを保存するスプレッドシートのID}");
  PropertiesService.getScriptProperties().setProperty('SHT_NAME_OUTPUT', "{ログを保存するスプレッドシートのシート名}");
}
function doGet() {
  const urlOwn = ScriptApp.getService().getUrl();
  const urlPost = PropertiesService.getScriptProperties().getProperty('POST_URL');
  if (urlOwn == urlPost){
    return ContentService.createTextOutput("アクセスできないページです");
  } else {
    return HtmlService.createTemplateFromFile("index").evaluate();
  }
}
function postFormData(data) {
  const payload = {
    user: Session.getActiveUser().getEmail(),
    name: data.name,
    type: data.file.getContentType(),
    file: Utilities.base64Encode(data.file.getBytes())
  };
  const options = {
    method : "POST",
    payload : payload
  }
  const url = PropertiesService.getScriptProperties().getProperty('POST_URL');
  const res = UrlFetchApp.fetch(url, options);
  return res.getContentText();
}
function doPost(e) {
  const data = e.parameter;
  const folderId = PropertiesService.getScriptProperties().getProperty('FOLDER_ID');
  const folder = DriveApp.getFolderById(folderId);
  const blob = Utilities.newBlob(Utilities.base64Decode(data.file), data.type, data.name);
  const url = folder.createFile(blob).getUrl();
  const shtId = PropertiesService.getScriptProperties().getProperty('SS_ID_OUTPUT');
  const shtName = PropertiesService.getScriptProperties().getProperty('SHT_NAME_OUTPUT');
  const sht = SpreadsheetApp.openById(shtId).getSheetByName(shtName);
  const array = [ data.user, url ];
  sht.appendRow(array);
  return ContentService.createTextOutput("保存が完了しました");
}
index.html
フロントで表示するものです
<!DOCTYPE html>
<html>
  <head>
    <base target="_top" />
  </head>
  <body>
    <form onsubmit="handleSubmit()">
      <div>
        <label>ファイル名</label>
        <input name="name" type="text" placeholder="保存時のファイル名" required="required" autocomplete="off"/>
      </div>
      <div>
        <label>ファイル</label>
        <input name="file" type="file" accept="image/jpeg, image/png, application/pdf" required="required" autocomplete="off"/>
      </div>
      <input type="submit" value="送信">
    </form>
    <script>
      window.addEventListener("load", function(){
        document.querySelector("form").addEventListener("submit", function (event) {
          event.preventDefault();
        })
      });
      function handleSubmit() {
        document.querySelector("input[type=submit]").disabled = true;
        const data = document.querySelector("form");
        google.script.run
          .withFailureHandler(onFailure)
          .withSuccessHandler(onSuccess)
          .postFormData(data);
      }
      function onSuccess(rslt){
        alert(rslt);
        document.querySelector("input[type=submit]").disabled = false;
      }
      function onFailure(){
        alert("正常に完了しませんでした");
        document.querySelector("input[type=submit]").disabled = false;
      }
    </script>
  </body>
</html>
3. セットアップ方法
GASの編集画面からsetup()を実行
開いたGoogleアカウントの権限確認画面で許可を選択
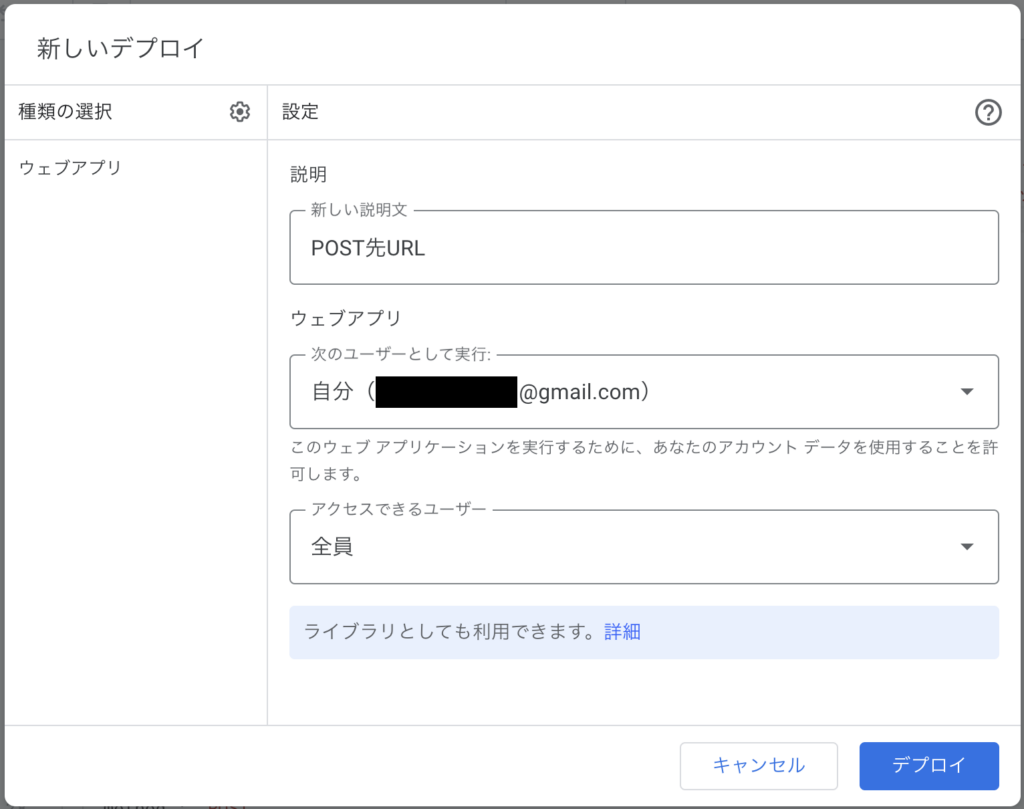
「デプロイ」から以下の通り設定した新しいデプロイを作成する
必ず「次のユーザーとして実行:自分」「アクセスできるユーザ:全員」で設定してください
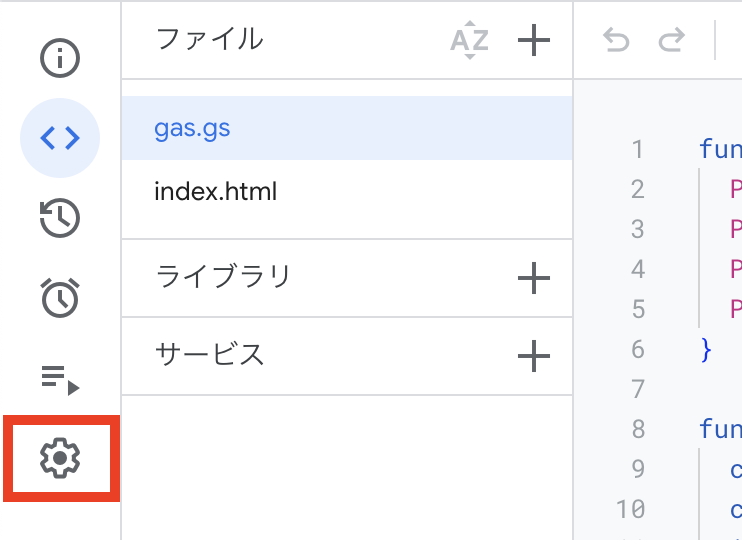
左側のタブからプロジェクトの設定を選択
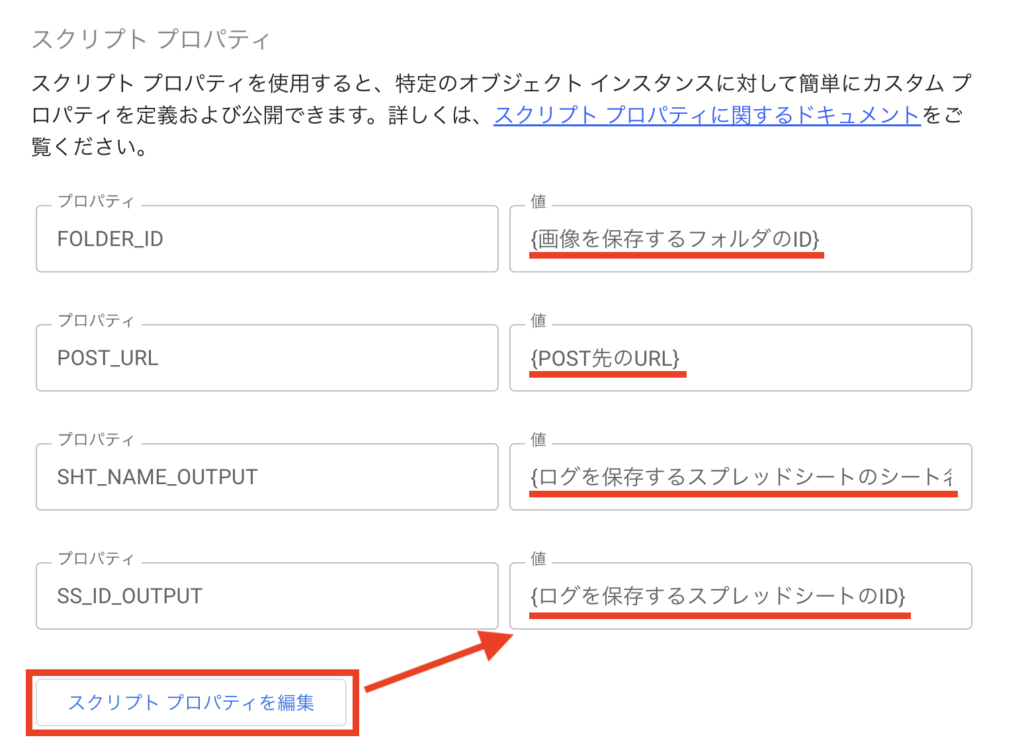
画面最下部までスクロールし、「スクリプトプロパティを編集」を押下し、値の部分を変更
・フォルダのIDは保存したいフォルダを表示し、URLから確認してください
https://drive.google.com/drive/folders/{フォルダID}
・POST先のURLはSTEP.2で生成したURLを設定してください
・スプレッドシートのシート名は作成したログを保存したいシートの名前を記入してください
・スプレッドシートのIDはスプレッドシートを表示し、URLから確認してください
https://docs.google.com/spreadsheets/d/{スプレッドシートのID}/edit?~
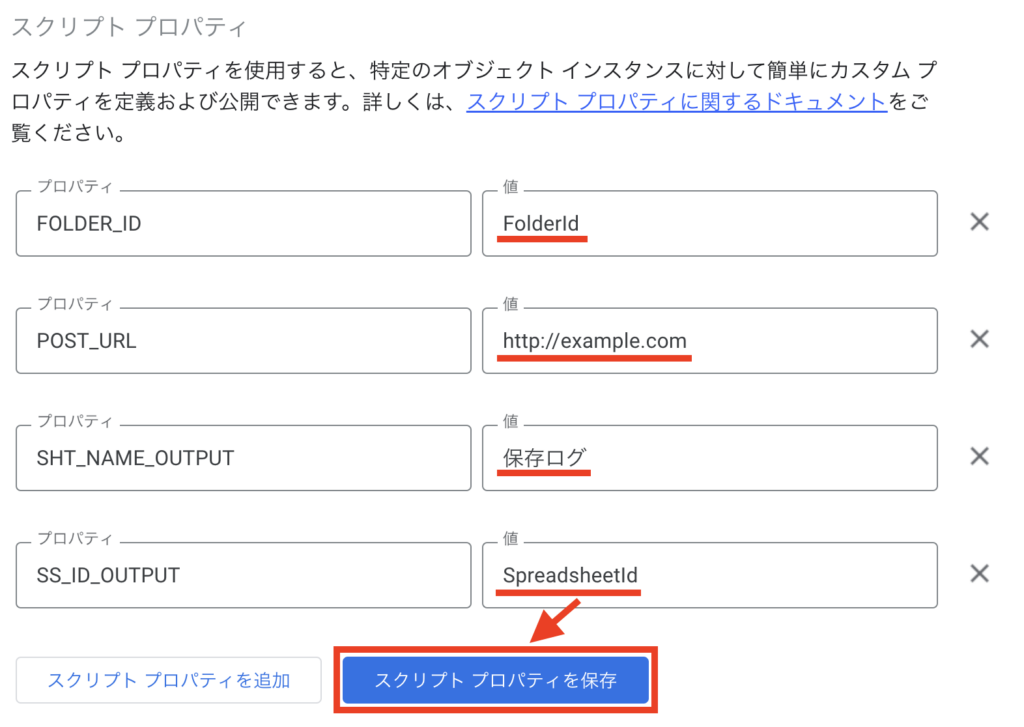
変更後に「スクリプトプロパティを保存」を押下し、変更した内容を保存する
「デプロイ」から以下の通り設定した新しいデプロイを作成する
必ず「ウェブアプリケーションにアクセスしているユーザー」で実行するように設定してください
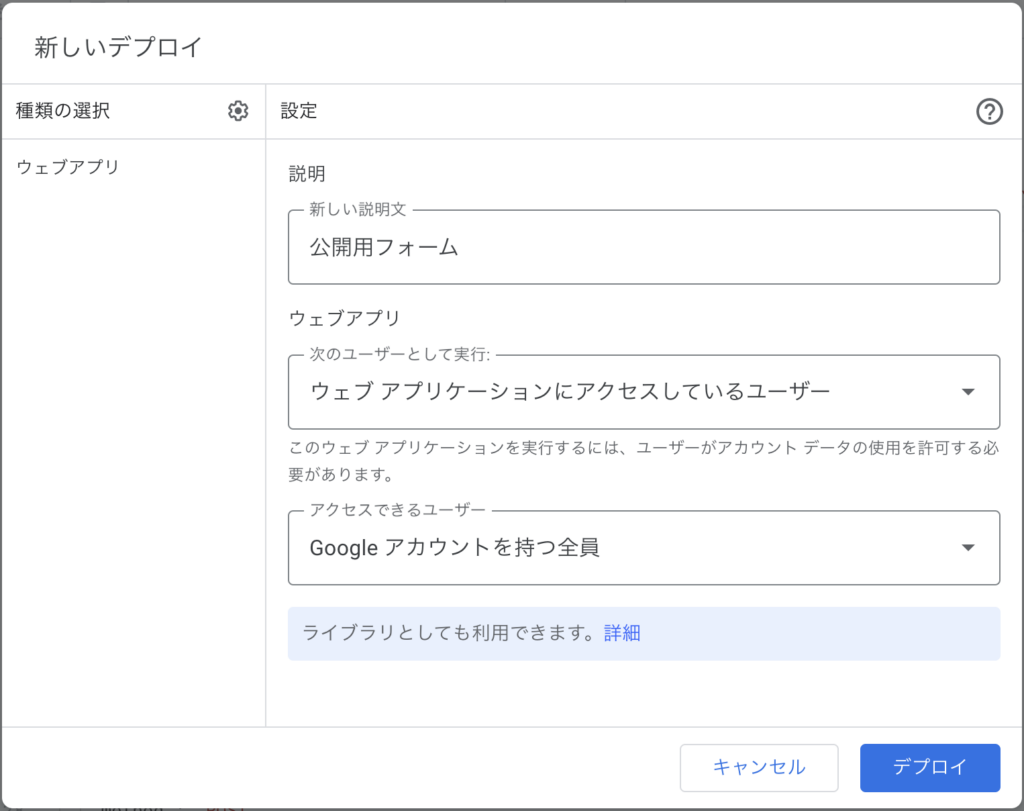
STEP.6で生成されたウェブアプリのURLにアクセスすることでフォームを利用できます
4. コード解説
※ JavaScriptの挙動については詳細は割愛しています
gas.gs
gas.gsに記述するコードについて解説します。
PropertiesServiceクラスのgetScriptProperties()メソッドでスクリプトプロパティを取得
取得したプロパティに対してPropertiesクラスのsetProperty(key, value)メソッドで各キーに対して値を保存
 PropertiesService.getScriptProperties().setProperty('POST_URL',"{POST先のURL}");
 PropertiesService.getScriptProperties().setProperty('FOLDER_ID', "{画像を保存するフォルダのID}");
 PropertiesService.getScriptProperties().setProperty('SS_ID_OUTPUT', "{ログを保存するスプレッドシートのID}");
PropertiesService.getScriptProperties().setProperty('SHT_NAME_OUTPUT', "{ログを保存するスプレッドシートのシート名}");webサイト読み込み時(GET時)に動作
ScriptAppクラスのScriptApp()メソッドで現在アクセスしているウェブアプリの公開制御用のオブジェクトを取得
取得したオブジェクトに対してServiceクラスのgetUrl()メソッドでウェブアプリのURLを取得し、変数urlOwnに格納
const urlOwn = ScriptApp.getService().getUrl();PropertiesServiceクラスのgetScriptProperties()メソッドでスクリプトプロパティを取得
取得したプロパティに対してPropertiesクラスのgetProperty(key)メソッドでキーPOST_URLに紐づく値を取得し、変数urlPostに格納
const urlPost = PropertiesService.getScriptProperties().getProperty('POST_URL');現在アクセスしているウェブアプリのURL(変数urlOwn)とPOST先のURL(変数urlPost)が一致する場合、
POST先URLからアクセスしているため、フロントに出力する内容としてエラーテキストをTextOutputオブジェクト型で返す
TextOutputオブジェクトはContentServiceクラスのcreateTextOutput(content)メソッドでテキストをTextOutput オブジェクトに変換して生成
現在アクセスしているウェブアプリのURL(変数urlOwn)とPOST先のURL(変数urlPost)が一致しない場合、
公開用フォームからアクセスしているため、フロントに出力する内容としてindex.htmlをHtmlOutputオブジェクト型で返す
HtmlOutputオブジェクトはHtmlServiceクラスのcreateTemplateFromFile(filename)メソッドでhtmlファイルをHtmlTemplateオブジェクトに変換し、HtmlTemplateクラスのevaluate()メソッドで変換して生成
if (urlOwn == urlPost){
  return ContentService.createTextOutput("アクセスできないページです");
} else {
  return HtmlService.createTemplateFromFile("index").evaluate();
}GASではオブジェクト形式でPOSTすると自動的にform-data形式と認識されるため、JSON化は不要
POSTで渡すデータを変数payloadにオブジェクト形式で格納
userにはユーザのメールアドレスを格納
SessionクラスのgetActiveUser()メソッドでスクリプトを動かしているユーザの情報を取得
取得したプロパティに対してUserクラスのgetEmail()メソッドでユーザーのメールアドレスを取得
nameにはフォームで入力したファイルの名前を格納
typeにはフォームで選択したファイルのMIMEタイプを格納
MIMEタイプはdata.fileがBlobオブジェクトになっているため、BlobクラスのgetContentType()メソッドで取得
fileにはフォームで選択したファイルをエンコードして格納
Utilitiesクラスのbase64Encode(data)メソッドでバイト配列からBase64でエンコードされた文字列を生成
バイト配列はdata.fileがBlobオブジェクトになっているため、BlobクラスのgetBytes()メソッドで取得
const payload = {
  user: Session.getActiveUser().getEmail(),
  name: data.name,
  type: data.file.getContentType(),
  file: Utilities.base64Encode(data.file.getBytes())
};
HTTPリクエスト時のパラメータを変数optionsにオブジェクト形式で格納
methodにはリクエスト方法を格納
payloadには変数payloadに格納したオブジェクトを格納
const options = {
  method : "POST",
  payload : payload
}PropertiesServiceクラスのgetScriptProperties()メソッドでスクリプトプロパティを取得
取得したプロパティに対してPropertiesクラスのgetProperty(key)メソッドでキーPOST_URLに紐づく値を取得し、変数urlに格納
const url = PropertiesService.getScriptProperties().getProperty('POST_URL');UrlFetchAppクラスのfetch(url, params)メソッドでHTTPリクエストを行い、レスポンスを変数resに格納
const res = UrlFetchApp.fetch(url, options);変数resに格納されたHTTPレスポンスを文字列にエンコードして返す
return res.getContentText();POST時に動作
POSTされたデータからリクエストパラメータを取得し、変数dataに格納
const data = e.parameter;PropertiesServiceクラスのgetScriptProperties()メソッドでスクリプトプロパティを取得
取得したプロパティに対してPropertiesクラスのgetProperty(key)メソッドでキーFOLDER_IDに紐づく値を取得し、変数folderIdに格納
DriveAppクラスのgetFolderById(id)メソッドでフォルダを取得し、変数folderにフォルダオブジェクトを格納
const folderId = PropertiesService.getScriptProperties().getProperty('FOLDER_ID');
const folder = DriveApp.getFolderById(folderId);UtilitiesクラスのnewBlob(data, contentType, name)メソッドでファイルオブジェクトを生成
dataはUtilitiesクラスのbase64Decode(encoded)メソッドでBase64でエンコードされた変数dataのfileから生成
contentTypeは変数dataのtypeを設定
nameは変数dataのnameを設定
FolderクラスのfolderObject.createFile(blob)メソッドで生成したBlobファイルを指定したフォルダに保存
保存したファイルにFileクラスのgetUrl()メソッドを使用し、URLを取得して変数urlに格納
const blob = Utilities.newBlob(Utilities.base64Decode(data.file), data.type, data.name);
const url = folder.createFile(blob).getUrl();PropertiesServiceクラスのgetScriptProperties()メソッドでスクリプトプロパティを取得
取得したプロパティに対してPropertiesクラスのgetProperty(key)メソッドでキーに紐づく値を取得し、変数に格納
SpreadsheetAppクラスのopenById(id)メソッドでスプレッドシートを取得し、SpreadsheetクラスのSpreadsheetObject.getSheetByName(name)メソッドでシートを指定して変数shtへシートオブジェクトを格納
シートに書き込むデータとして変数dataのuserと変数urlを変数arrayに配列として格納
SheetクラスのSheetObject.appendRow(rowContents)を使用してデータが入っている最下行の下に変数arrayをレコードとして追加
  const shtId = PropertiesService.getScriptProperties().getProperty('SS_ID_OUTPUT');
  const shtName = PropertiesService.getScriptProperties().getProperty('SHT_NAME_OUTPUT');
  const sht = SpreadsheetApp.openById(shtId).getSheetByName(shtName);
  const array = [ data.user, url ];
  sht.appendRow(array);
フロントに出力する内容としてテキストをTextOutputオブジェクト型で返す
TextOutputオブジェクトはContentServiceクラスのcreateTextOutput(content)メソッドでテキストをTextOutput オブジェクトに変換して生成
return ContentService.createTextOutput("保存が完了しました");index.html
index.htmlに記述するJavascriptについて解説します。
画面読み込み完了後に自動実行
form要素のsubmit時にsubmitのデフォルトイベントをキャンセルするイベントを追加
document.querySelector("form").addEventListener("submit", function (event) {
  event.preventDefault();
});GASではエレメントを渡すと自動的にform-data形式に変換されるため、個別の要素取得は不要
重複送信防止の為、submitボタンを非活性化
document.querySelector("input[type=submit]").disabled = true;変数dataにform要素を格納
const data = document.querySelector("form");GAS側の関数postFormDataに変数dataを渡す
関数実行が失敗した場合、関数onFailureを動作させる
関数実行が成功した場合、関数onSuccessを動作させる
google.script.run
  .withFailureHandler(onFailure)
  .withSuccessHandler(onSuccess)
.tryAuth(authOwn);レスポンスをアラートで表示
alert(rslt);submitボタンを活性化
document.querySelector("input[type=submit]").disabled = false;関数実行が失敗した旨をアラートで通知
alert("正常に完了しませんでした");submitボタンを活性化
document.querySelector("input[type=submit]").disabled = false;まとめ
GASでPOSTをリクエストしてGASで処理する方法を解説しました。
導入自体は少し複雑ですが、スクリプトを実行するユーザの違いによる制限をクリアにできます。
かなり自由度が高くなりますので、ぜひ活用してみてください。
この記事は役に立ちましたか?
もし参考になりましたら、下記のボタンで教えてください。

コメント